This series of lessons is both a continuation of the How to (Finally) Learn Your Fretboard series, as well as an in-depth look at triad soloing. Before you run for the hills in fear of another lame explanation/lesson on triad soloing, stick around for a bit because this is the unorthodox one that might work for you.
I was always intrigued by the triad approach to soloing on guitar, and while the theory was simple enough to grasp, I couldn’t find a practical way to implement it into my playing; it either sounded melodic but forced, or oversimplistic and predictable.
I knew the approach had potential, so I stuck with it until I found the missing ingredients to make it work on the fretboard and be able to access any arpeggio, scale or mode that I wanted to play in any given situation–and even on the fly.
In this series, I want to break that process down into simple steps that you can follow in order to master triad soloing, which also means breaking away from the conventional patterns and boxes that condemn you to repeating yourself ad nauseum, as well as being time-consuming to learn, and into the world of formulas. The steps in this series can be applied to any arpeggio, scale or mode that you want to learn in any key.
Let’s get into it!
How (not) to Learn Triads I
I always found it strange how some (most) guitar educators teach you triads, let’s say the minor triad (1, b3, 5), as twelve different three-note patterns, then further subdivide these into triad inversions. While this is theoretically interesting, it’s just not a practical way to look at triads on the guitar. In fact, it’s like a lot of things on guitar—there’s too much unnecessary information. You could probably get through your entire playing career without using the 2nd inversion A minor triad on the bottom three strings up at the 20th fret. My point here is that while there are twelve minor triad patterns (24 counting the ones above the 12th fret), each one contains two notes from the adjacent one, which makes them slightly redundant (at least in my head).
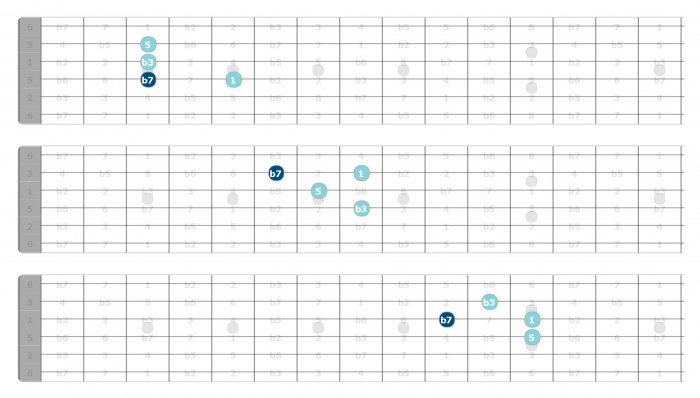
There are three great triad patterns sitting right in the middle of the fretboard. These are G Minor triads, and we’ll keep everything in G for the rest of this series, but know that it’s all movable.

If you just add the rest of the triad intervals either side of these main shapes, you get this:

Isn’t that a whole lot easier than learning twelve different shapes? I mean, it just seems like a waste of time to me to learn redundant patterns/shapes on guitar. If you solo using triads, the truth is that you’re going to spend 90% of your time on the top 4 strings.
Hopefully, you’ll be able to get comfortable with these shapes by thinking of them this way. By the way, it’s not essential to learn the dark blue intervals right now.
How (not) to Learn Triads II
The way to turn triads into a powerful soloing tool is to add one interval. I know that they’re technically not triads anymore but this is a game-changer because it gives us the backbone of a wide range of useful formulas, or in other worlds, arpeggios, scales and modes.
For our G Minor triads, we’re going to add the b7.

Task 1: What I want you to do is to know exactly what interval you’re playing at any given moment using the above ‘clusters’, which I won’t call triads anymore. Do not skip this exercise, it’s the crux of the method. If you find it too much to learn all three patterns, you can go through the series using just the first shape to see how this works out, then if you like it, you can invest the time in the other shapes.
In Part 2, I’ll show you why 4-note clusters are better than triads for learning triad soloing.


