
Chord tone soloing is one of those things that either eludes guitarists, or they shy away from it in favor of the one-scale-fits-all approach. While you can get by without necessarily learning chord tone soloing, the extra dimension it adds to your playing really makes it worthwhile investment of your practice time. In this article, I want to show you a simple method that you can implement almost immediately into your playing so that you can start to hit all the right notes in all the right places.
A looper pedal is a great tool to have on hand for practicing chord tone soloing. If you don’t have one already, I’d definitely recommend investing in one such as the Ditto by TC Electronic, the Boss RC-1 Loop Station, or this selection of others. If you don’t have a looper pedal, then simply record yourself with your phone.
Progression 1
The first chord progression we’re going to tackle is Bm – A – E, which is a classic progression used in songs as diverse as ‘Wicked Game’ by Chris Isaac and ‘You Know, You Know’ by the Mahavishnu Orchestra.
Look at the following diagram. The notes in red are from Bm, the notes in dark blue are from A, and the notes in light blue are from E, but more importantly, they are the new notes that are introduced as each chord changes. So, when the chord changes from Bm to A, try to land on one of the notes in dark blue. When we get to the E chord, the only new note is G# – and as we haven’t heard that note yet, its impact is greater; it sounds like your solo is following with the chord changes.
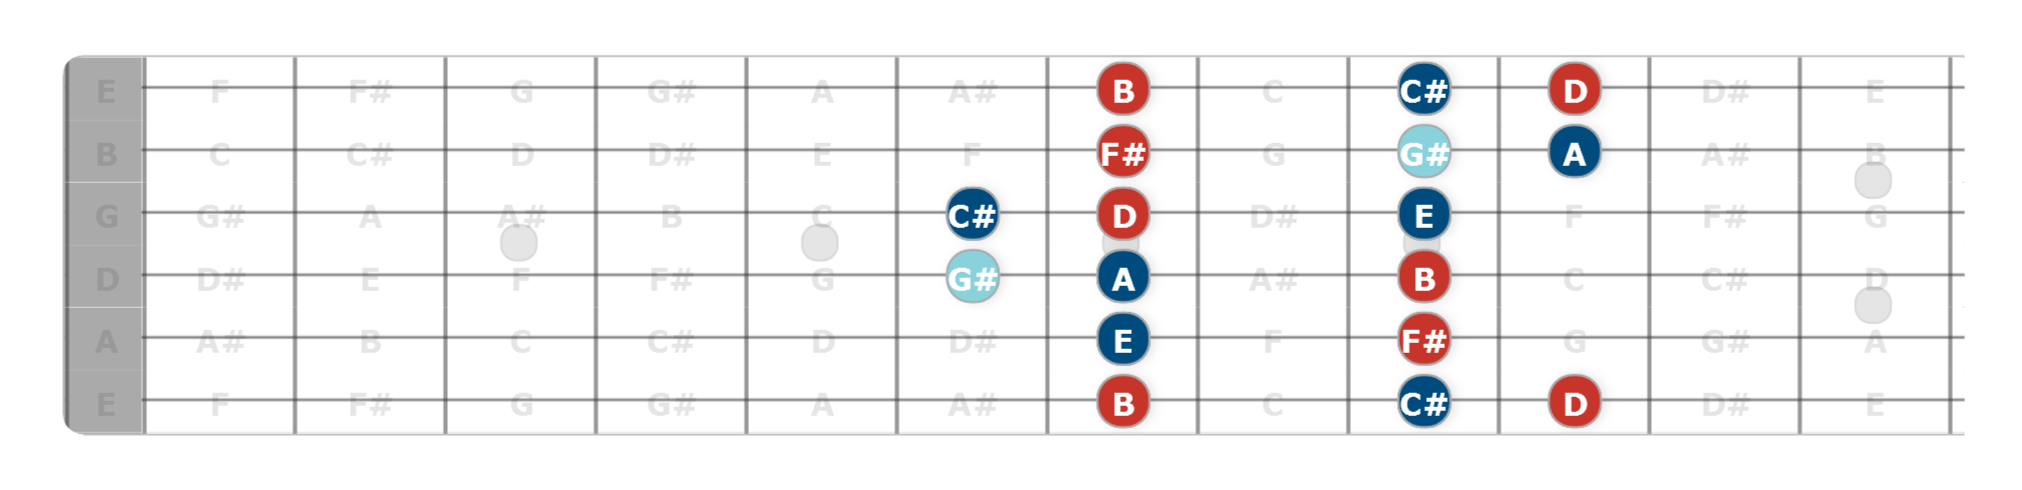
The approach here then is to hold back on certain notes until the chord changes, then use them to greater effect. There are a couple of other things that you’re learning here; the first is to keep the notes close together on the fretboard so that you’re not jumping all over the place; the second is that you’re bringing more music out of a familiar position on the fretboard – you may recognize Bm Pentatonic in there, and if you take the pattern as a whole, it is in fact B Dorian.
Feel free to treat this pattern like Bm Pentatonic or B Dorian but with the awareness of what notes to land on/hit when the chords change. For the E chord, by all means land on the other two notes (B and E) to hear the difference in impact they have compared to landing on the G#.
Progression 2
This progression also contains three chords (G, C, and F) that you could play G – C – G – C – F to make sure G is our home chord. You may recognize the pattern below as a C Major scale shape you’ve probably practiced many times, only now we’re going to choose the notes we play for a greater chord tone soloing effect.
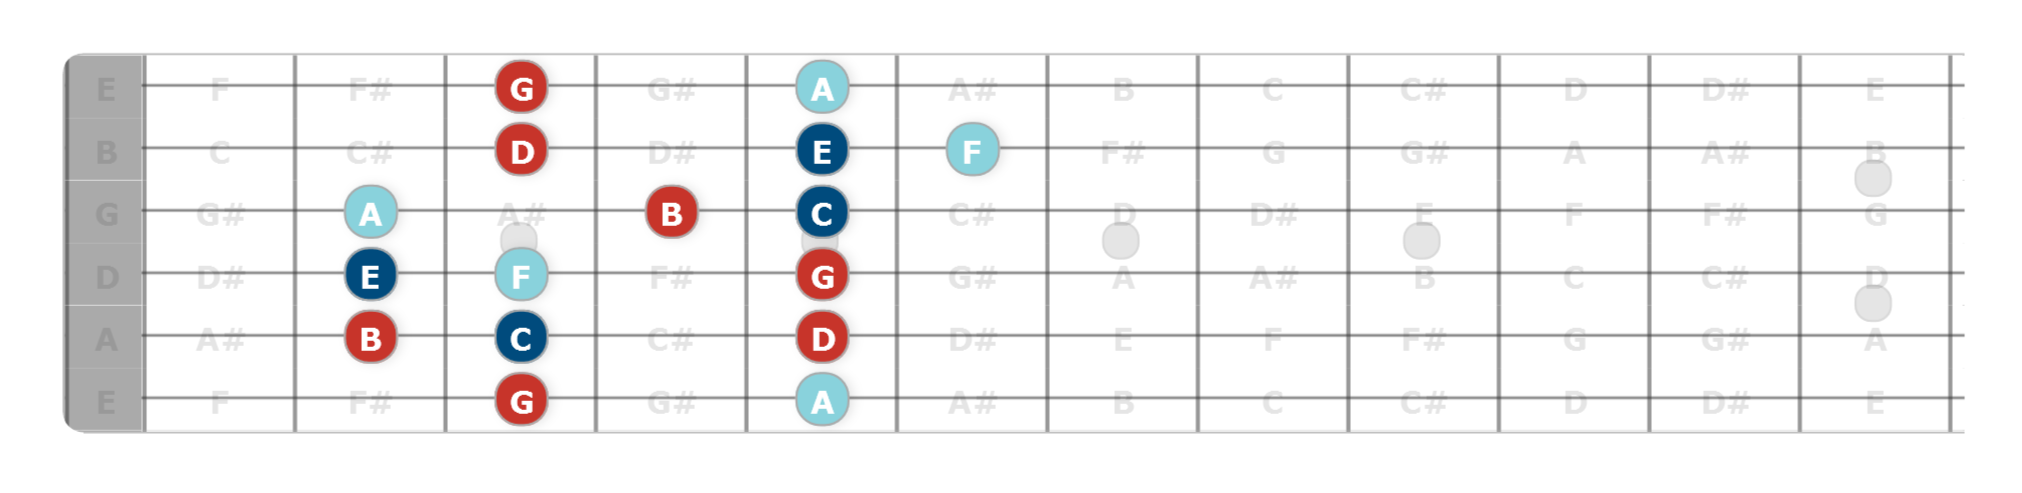
Again, you can play all the notes from the pattern, but bear in mind that you might want to hold back on some to really outline the changes. When you’re creating your looping tracks, leave plenty of time in between each chord change so that you’re not putting unnecessary pressure on yourself. You could also see this progression as a G Mixolydian one, and it is, only the one-scale-fits-all approach may leave your solo sounding a little aimless. Try them both to compare sounds and see what you think.
Progression 3
Our final progression for this chord tone soloing guide contains a chord that’s not in the key. By using this approach, you can really take advantage of that stray chord instead of just blowing past it and hoping for the best. The progression is the classic Andalusian cadence of Am – G – F – E; the first three chords are in the key of C Major/A Minor, but E is not. Let’s see how it looks on the fretboard.

So, our home chord is Am, followed by G, and with these two chords we’ve ‘used up’ most of the notes, but the A will still sound great over the F because it’s the major third. To make the most of that out-of-key E chord, that G# is going to sound amazing because it hasn’t been played yet and it’s the major third of E. Notice that you’re still safe if you play E or B over that E chord, but the G# really makes it sound like you know what you’re doing!
Conclusion – Chord Tone Soloing
There are many approaches to playing over chord changes and different things work for different players. I like this concept because it gives you a certain amount of control over what you play and should help you feel much less lost on the fretboard. If you want to apply this to any chord progression, use the following steps:
- Decide which is the home chord in the progression (usually the first or last) and choose ONE area of the fretboard to mark it out as we did in red above.
- Mark the next chord (as we did in dark blue), but just the new notes, as closely as possible to the home chord.
- Do the same with any other chords (as we did in light blue), just marking any new notes as closely as possible to the other chords.
- See if you can build some kind of scale pattern around the notes. If you can’t, don’t worry – just fill out the repeating notes around the chords in the relevant colors.
- Pay special attention to any chords that are outside the key.
- Stay in one area on the fretboard as we did above – this is more than enough information to start with.
- Load up your looper with the progression leaving enough space between chord changes and see what you can come up with.
- Record yourself and listen back to what you played, you might be surprised at how good it sounds, plus this is the quickest way to improve.
If this approach didn’t quite work for you, check out our free 8-part series, ‘How to Solo Over chord Changes‘, right here on the blog.


Thank you for your insightful instruction. Have you written a follow up book to
‘7 String Guitar Method, Book 1’?
Hi Maric, this book is in the works and should be ready for January 2021.