Chord tone soloing and soloing over changes on guitar is a complex area which can be approached in many ways, and where even a cursory search for online resources is likely to leave you with more questions than answers. It’s particularly difficult on guitar because guitarists tend to arrive at this point with varying amounts of knowledge and gaps in their playing, whereas other instrumentalists approach soloing over changes in a more uniform way. For example, you may have learned how to improvise using scale patterns, or arpeggios; you may improvise entirely by ear and not even be aware of the theory behind what you’re playing, or you may have had a more academic approach to the subject. While it’s true that everyone learns differently, I believe that a solid approach to soloing over changes requires a system that is a) not based on patterns, b) develops the ability to locate notes on the neck either by interval or by the name of the note, and c) develops the player’s ear to the point where he/she is able to fully express themselves and truly improvise on their instrument as oppose to a formulaic, calculated and somewhat cold approach to something that should be, insofar as is possible, spontaneously created in the moment; and this is what I hope to achieve with this series of blog lessons (also available as a PDF eBook here).
If you don’t have one already, I’d recommend buying a looper pedal as it will speed up the process of learning to improvise over changes immensely. You can pick up a looper for as little as $50, and there’s a great selection on Amazon which you can check out here. My personal favorites are the TC Electronic Ditto and the Boss RC-1, although pretty much any looper pedal on the market is great value for money.This method is intended to simplify the process of learning to improvise over chord changes on guitar; a process which, I sincerely believe, does not have to be an arduous and complicated one based on endless permutations of scale and arpeggio patterns. In fact, this series of posts contains no standard arpeggio or scale patterns at all; it is rather a blueprint for improvising over changes freely all over the fretboard, or over as much of the fretboard as you feel you need to occupy.Make sure you follow the parts in order and complete all the exercises; if you stick to this process, you’ll build up the necessary knowledge to take away and apply to your own soloing style, as well as being able to improvise over pretty much anything that’s thrown at you. Let’s begin.
Note Finding and the Pattern Pitfall
As a prerequisite for this book, I’d recommend learning how to locate notes on the fretboard in two ways. These ways are NOT pattern-based, as we want to move beyond the limitations of patterns by taking control of the fretboard through intervals and note names – these are the two methods by which we’ll be finding notes. When you start to do this, you’ll notice a certain ‘pattern dependency’ which may lead you to initially reject these new ways of finding notes in favor of navigating the fretboard using patterns. While it’s true that old habits die hard, you’ll soon see the benefits of leaving patterns behind.
Intervals
I’m sure you’re already aware of intervals on guitar, so I won’t go into it here, but for a thorough study of intervals check out another of our books, ‘Melodic Soloing in 10 Days’. In this book we’ll be using intervals as formulas to decode chords and give ourselves various soloing options on the guitar neck. For example, if you have a Emaj7#5 chord to solo over, you need to know that it contains the intervals 1, 3, #5, and 7. In the next few chapters, you’ll see how to apply this information to the fretboard so that it is both easily understood and accessible.
Note Names
If you take that Emaj7#5 chord and work out the note names, they would be: E, G#, B#, and D#. This information also helps us, in conjunction with intervals, to find notes on the neck.At this point, I should emphasize that both systems complement each other and should be learned together. If the notes on the neck are still a gray area for you, take some time to learn where all the natural notes are, which doesn’t take long, then you can work out where the sharps and flats fall on the fly.You might be thinking that this sounds like a tedious process, and it is, but it’s also a liberating one which will free you from depending on patterns. Stick with it, or give it a couple of months at least, and you’ll be rewarded.
Pattern Problems
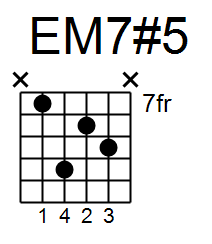
If you’re a pattern player, load up your looper with an Emaj7#5 chord, such as the one below, and play over it.

What did you play?
In my pattern playing days, I probably would have gone with the Lydian Augmented scale because I knew that it worked over a maj7#5 chord. I didn’t know exactly why it worked, but I knew that that scale went with that chord. If we analyze the Lydian Augmented scale, we see that it contains the following intervals: 1, 2, 3, #4, #5, 6, 7. Compare it with the maj7#5 chord and you’ll see that it contains all the chord tones and is therefore (in theory) a good match.
The problem here is that most tunes won’t hang around on a maj7#5 chord for more than a few bars because it creates tension which needs to be resolved. While you’re working out a scale pattern to play over 2 bars of Emaj7#5 after having worked enough with the Lydian Augmented scale to make it musical, the tune is probably over. Don’t get me wrong, there are players that can do this, but it requires a lifetime of study to play over changes this way due to the sheer amount of information that not only must be digested, but must become second nature for it to be useful, and above all, musical.
Compare the above to the following line of thinking: Emaj7#5 chord coming up – intervals are 1, 3, #5, 7 – notes are E, G#, B# and D# – I need to make my way to one of those intervals/notes to outline the change.
As we shall see in Part 2, the defining intervals in most any chord are the 3 and 7 (in this chord the 5 is also interesting because it’s a #5). Even if I manage to land on just one of those intervals when the Emaj7#5 comes around, it’s going to sound good. Therefore, I can reduce it to one thing to remember: land on the #5, or the B# when the chord changes and it’ll sound good; the same applies to the 1, 3, and 7. You’ll then notice that your ear picks up on this and will eventually find the note itself without having to do this kind of calculations. This is what doesn’t happen when you rely on scales to play over changes because the pattern dictates, for the most part, what you’re going to play. If you rely heavily on patterns and you suddenly start trying to play what’s in your head, you’re going to be fighting with your fingers at first.
In Part 2, we’ll look at four simple sequences that will give you the basis for soloing over 90% of chords and chord changes.


